The original washroom was a DYI project of the previous homeowners. While they were proud of their job, it wasn’t professional and had some issues.
The Issues
From a design standpoint, several things stood out:
The toilet was separated into its own room. Not bad on its own, but it was crammed against one wall, and the rest of the room looked empty.
The spa was bordered on three sides and felt closed in. Its stairs jammed up against the shower and didn’t leave enough room in that area.
From a professional standpoint, there were other issues:
The drywall work was poor in some areas. The ceiling needed work as well as the area around the shower.
The drywall angled out at the shower and looked wrong. We guessed that it was due to the plumbing. This was later confirmed as the homeowners were unaware of how to install it into the wall. In addition, the hot and cold lines were reversed at the mixer. They “fixed” the issue by installing the value upside down.
The tub never drained correctly and was damaging the ceiling below. It was again caused by improper installation and shoddy plumbing.
The toilet suffered from other issues, and the solid stack they modified looked like someone had tried to paint it with glue. Not sure what they were trying to achieve, but much of it had to be redone.
The Wall Angles Outward From the Plumbing
Previous Vanity Was Nice But Had Tile Countertop
A Very Lonely Toilet
The Spa Felt Closed In
Another View of the Strange Angled Wall At The Shower
The Design
A Rendering of the Proposed Design
Another Rendering Showing the Large Neo Shower
A 3D View of the Old Superimposed on the New
Another Rendering of the Old Superimposed on the New
The proposed design was much more spacious and had some notable features:
A large Neo-Shower with custom glass
Vertical Subway tiling. A first for us
Wall-to-wall tiling
Custom wainscot and crown moulding
“Invisible” joints on casings
The Final Product
We think the final product was worth the effort, and this bathroom renovation is one for the books!
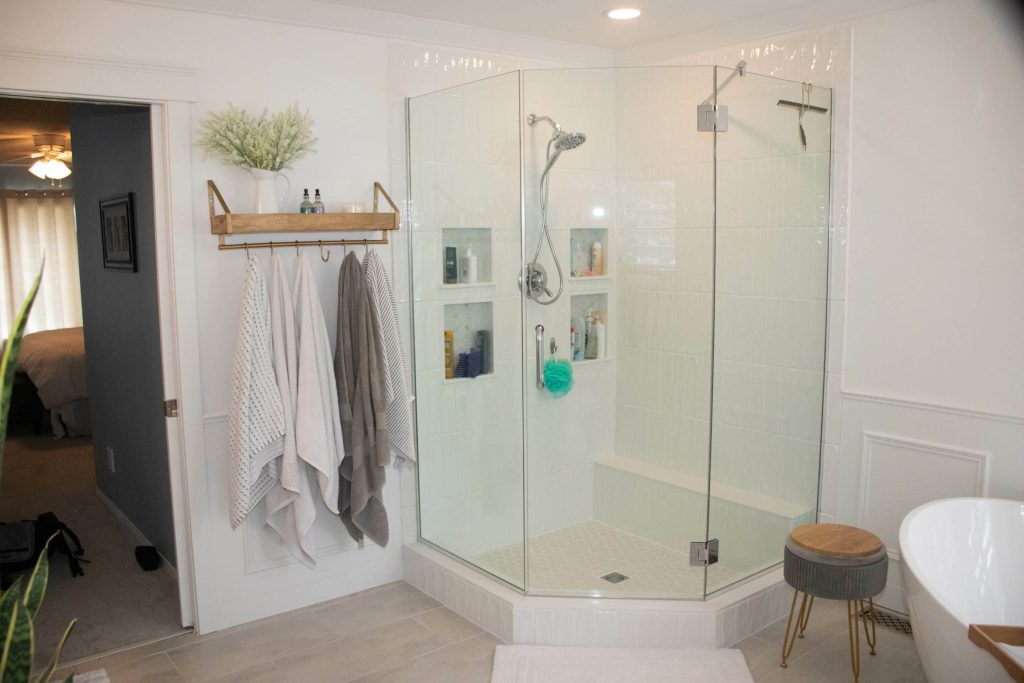
The New Tub Area
The Neo Shower with Custom Glass
Invisible Trim Work with No Seams
The New Custom Vanity
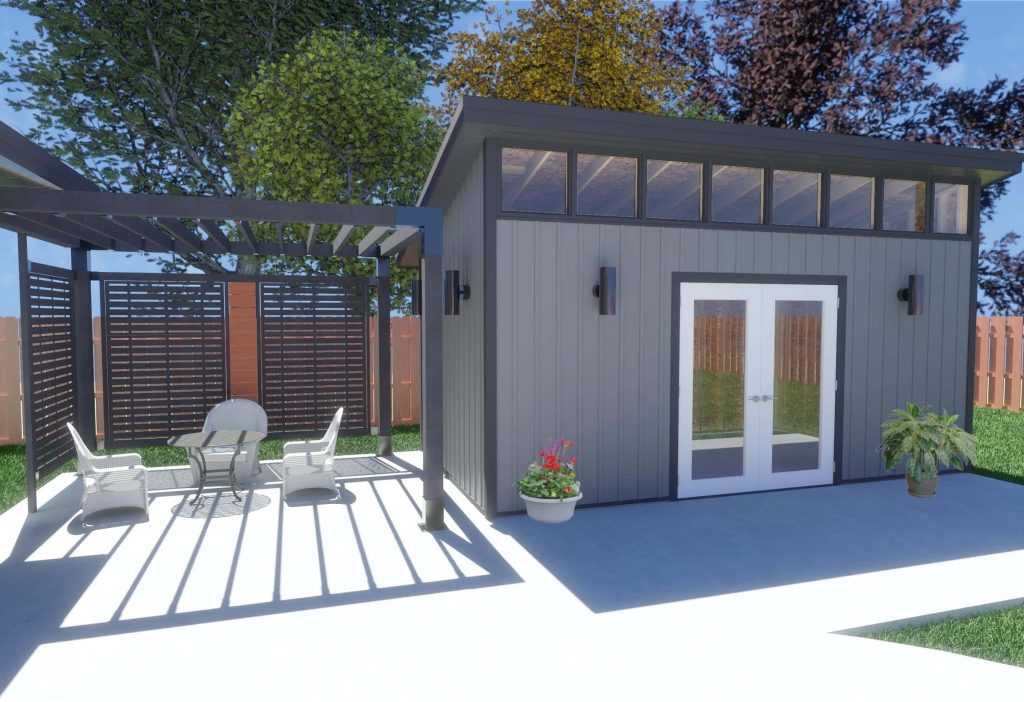
Pergola And High-End Utility Shed
This was a definite challenge. Built during covid, we faced all kinds of issues with supply shortages, a three-week concrete strike, and a shortage of storage space due to their basement being renovated.
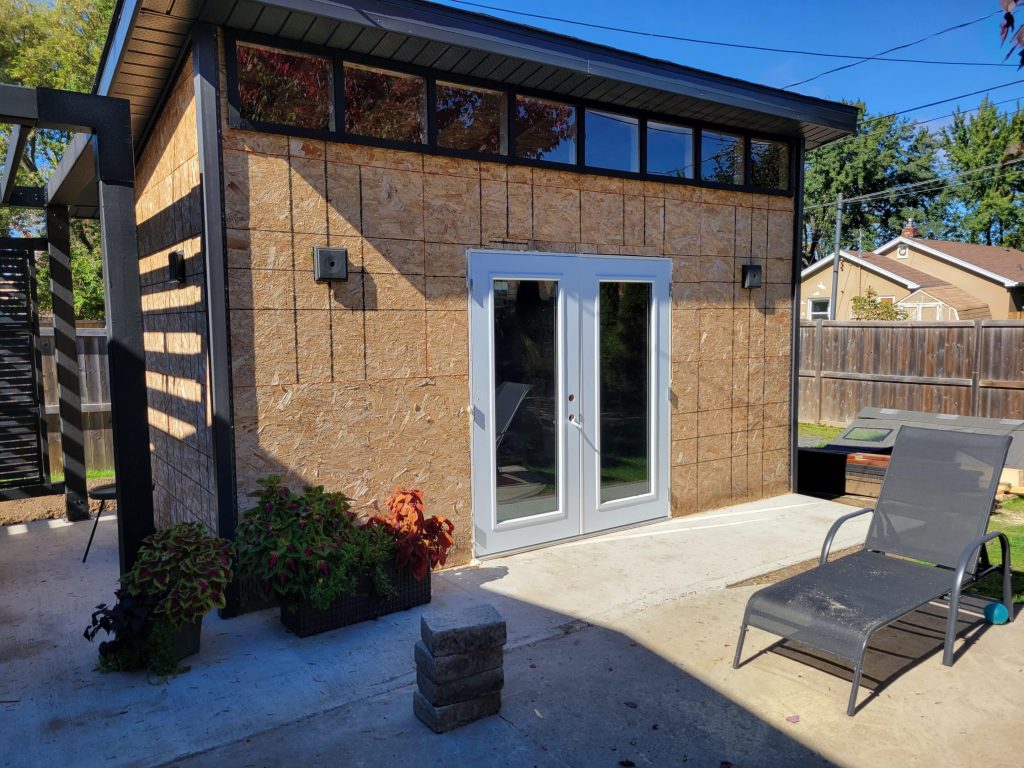
The work took place over 2 years as a result of the issues. We had to build the shed in the fall without the slap so it could be used for temporary winter storage. We poured the slab the next year and moved the shed by hand onto it. That is not bad, considering it was 16′ x 10′ and weighed close to 1000 lbs.
The design started with a drawing the client had of the shed similar to the one she envisioned. The pergola was a mish-mash of ideas and parts to create something we think is quite beautiful.
A Rendering
The Shed
Design Documents
Design Documents
Design Documents
Pergola
Pergola
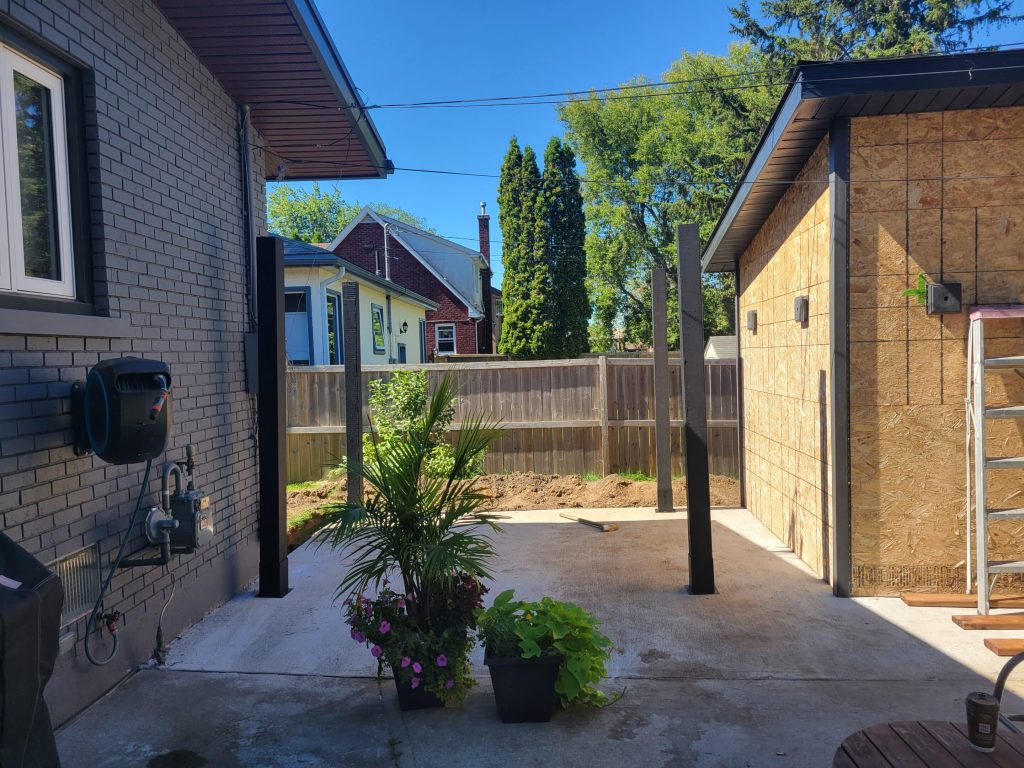
In Progress
In Progress
In Progress
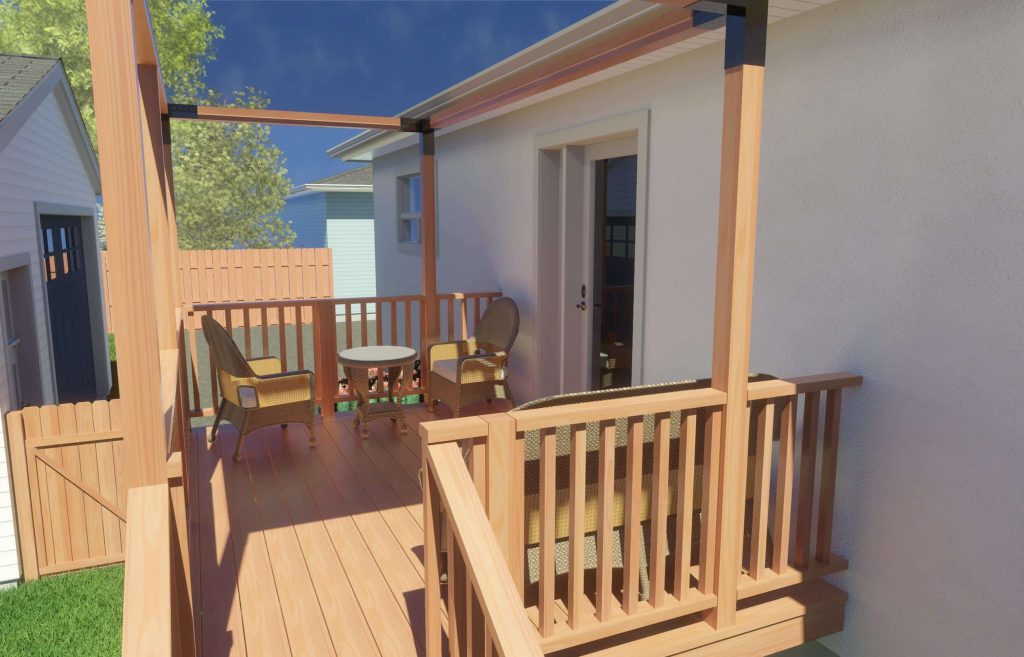
A Challenging Small Deck
While this was a small deck, there were some definite challenges. We had to build it in a small area constrained by a 36″ gate and a couple of windows. The old fence, once removed, would also leave a weird triangle-shaped patch of grass. They also wanted a pergola incorporated on an 8×12 deck!
We think the final result is quite nice and covers all the bases. Without our modelling software, it would have been a real challenge to help the client picture the project.
Some Features:
Picture framed decking
Freestanding
Custom Flower Box
Shade sail (not pictured)
Rendering 1
Rendering 2
Rendering 3
After: The Flowerbed and gate
After: The Sunshade Area
A Work In Progress
A Work In Progress
A Work In Progress
Before: The Triangle Area
Before: The Triangle Area
Before: A strange mini deck
Large Lakefront Composite Deck
We love unusual projects, and this project was exactly that! Custom designs take many builders out of their comfort zone, but not us – we look forward to it. This was an opportunity to sharpen our skills and build what many others only dream of.
The Design
Originally the customer wanted a square deck, approximately 25′ x 40′, with composite deck boards. We advised the client that it would only add a small amount to the project’s overall cost to break it up into different levels and areas but would offer a much greater resale value. They agreed, and we moved on to the next item: composite decking.
We use Trex for most composite decks because we believe in the product. They offer a strong warranty and were one of the pioneers in the industry. We suggested using their Transcend line in this case, as it offers greater scratch resistance and better texturing.
As usual, we employed 3D software tools to build a visual model and create construction documents that allowed the deck to be built. This allowed the client to make adjustments and pick suitable colours with confidence that the final product would be something they loved.
A Beautiful Front to add a Deck
The Front from Another Angle
Rending #1 of the New Deck
Another Angle of the Rendering
The Build
We have seen our share of on-ground decks attached to the house. This is not legal as it requires piers 5′ deep (in our area). The ground around the lake is mostly rocky and would make drilling holes extremely difficult, so we designed the deck as freestanding.
Four-way deck blocks are the best option. If built correctly, the beams and substructure are completely rigid before the joists are even applied.
While Trex allows their products on 16″ centers, we have found that the board may droop in extreme heat. This is only a visual issue, and the boards return to shape when cool. However, it is only slightly more costly to use 12″ centers, and we recommend it. The decking was also done with a double picture frame on the outside, which requires special framing in the corners and when the boards run parallel with the joists. We used hidden fasteners as much as possible to make the decking as clean as possible.
The Deck Framing
The Deck Framing
The Deck Framing
The Deck Framing
4 Way Deck Blocks
The Final Products
The end result was quite stunning, and the owners were pleased with the project. As is common with these kinds of projects, we also picked up several others in the area after neighbours saw the work. There are still some lights to add; we will update this post with the final pictures once the job is complete.
Before the Facia is Install
Last Minute Steps and the Facia Installed
An Impressive Exterior Finishing Job on the Waterfront
Summer 2020
This project was on a beautiful property on the Lake Superior shoreline just north of Thunder Bay. The exterior finishing would consist of the main house, two sheds, a gazebo and a sauna with vinyl siding, soffits, facia, and steel roofing installed.
The house received various renovations and additions over the years, many of which had not been completed by professionals. Portions seemed cobbled together, and we would have to make the entire structure seamless. The job would take some artistry in addition to skill. For this project, we used Board and Batten vinyl siding and 3 Panel Traditional soffits from Royal Building Products.
FIXING THE DOUBLE ROOFLINE
The first issue to tackle was a double roofline on one gable. It looked odd; even the facia boards were different sizes between the house’s front and back. We cut off the lower roof and removed all the facia boards. We would install new boards that were thicker to make everything more sturdy. They would also be wider, helping tie everything together and making the roof look “beefier.”
Various Additions to the Home Had Led to a Double Roofline
We Had to Remove the Lower Section to Make it Look Correct
CUTTING DOWN THE FRONT OVERHANG
A large overhang at the front of the house blocked sunlight in the porch area. The clients wanted it shortened, which would fix the light issue. The change would also make the overall look more cohesive, matching the rest of the house.
Before Removing Front Overhang
Overhand Cut Down To Size
Overhang Complete with New Soffits, Fascia, and New Vinyl Siding
REBUILDING THE WORKSHOP ROOF
Next up was the workshop roof. This addition started as a shed that was moved over and connected to the house. The walls were okay, but the roof collapsed due to undersized rafters. Many were also spliced together and oddly spaced. Adding properly sized rafters spaced correctly fixed the issue.
We took the opportunity to correct the overhangs so they were the same as the rest of the house, helping fix the cobbled look. After sheathing and strapping, we installed the steel roof.
You Can See How Badly the Existing 2×4 Rafters Bent Under Load
We “Sistered” Larger and More Closely Spaced Rafters to Fix the Workshop Roof
The Overhangs Were Corrected so the Roof Would Look the Same as the Rest
The Workshop With Metal Roof In Place
THE MAIN HOUSE’S ROOF
The roof of the main house was the largest issue. The largest section in the front had two different slopes. When we ran a string line down the edge, it was over 2 inches high in the middle. It was also quite wavy from side to side. It required a week’s worth of shimming the strapping to get things flat.
After replacing the fascia boards, it started to look polished. We opted for a “rake” edge corner on the roof gables as they really enhance the look of a steel roof. After adding the soffits and fascia, the rooflines finally looked “tied together.”
Strapping and Shimming the Steel Roof
Installing the Steel Roof
Steel Roof without Facia Boards
Facia Boards and “Rake” Edges Installed
Soffits and Facia Being Installed
Levelling the Workshop Walls
The workshop roof was not its only issue; the original owner built the exterior walls with an upward slope. That was fine when taken alone but looked odd with the rest of the house. We shimmed the siding to get it straight and reframed the doorway. After the vinyl siding and door capping, that section blended seamlessly with the rest of the home.
The main beam on one side of the foundation had also rotted away. We jacked up that end and installed a new beam.
The Wall Was Slopped by Several Inches From Top To Bottom Which We Corrected.
Note the Doorway as You Look Down the Wall
Strapping to Level the Wall for Vinyl Siding
Strapping to Level Wall for Vinyl Siding Continues
The Wall After Correction
CAPPING THE WINDOWS AND DOORS
Window and door capping often makes all the difference to an exterior finishing job. Butting the siding right up to the window or door lacks definition and looks amateurish by modern standards. Adding casing boards and capping can make your project really “pop.”
Wood Frame Added to Window Before Capping
Adding Wood Frame for Window and Door Capping
Doors with Capping and Vinyl Siding
Door and Window Capped After Vinyl Siding
The Wall After Correction
Overhang Complete with New Soffits, Fascia, and New Vinyl Siding
EXTERIOR FINISHING ON THE GAZEBO
The client wanted a gazebo on the property spruced up. Originally, it would just have a steel roof installed to match the other items on the property. We suggested adding soffits and fascia to finish it off and have the look of a modern metal gazebo but have a much longer lifespan. The results were amazing, and the outdoor space created is very inviting.
Gazebo From Above
Gazebo with Soffits and Fascia
Gazebo by the Lake
Soffits and Fascia on Gazebo
FINISHING THE SAUNA
The sauna was in rough shape externally. The wooden frames on the windows were rotten, and the glass practically fell out when we removed them. One was covered over, and the other was replaced with a unit we removed from the main house.
We added the steel roof and siding as we did with the other locations. The door was sticking, so we removed it and planed it down. Although faded, it was still pretty solid, so we proposed using a faux antique finish. It turned out amazing, although our pictures don’t do it justice.
Vinyl isn’t a good choice next to the wood storage, so we took some leftover metal from the flashing and used it where the siding might get damaged.
Sauna with Vinyl Siding and Steel Roof
Metal Panel in Woodbox
Sauna with Vinyl Siding
Sauna with Vinyl Siding and Antique Door
Exterior Finishing on Sauna
THE SHEDS
Two sheds on the property needed some work to blend in. The first was new but never finished on the exterior. We added the usual siding and capped the doors in black sheet metal. The owner had issues with bears getting into the garbage, so we made two “bear resistant” trash storage bins and attached them to the shed. In the front, we added a box for tire storage. We will put the house number on the shed in the spring, and it will really stand out from the road.
The toolshed has some interesting features. The sheathing on the bottom was rotting due to trapped water from compost left next to it. We covered the lower portion in black sheet metal and added crushed stone for drainage. The door was capped, new hinges added, and a better door handle installed so the people could no longer accidentally lock themselves inside. 🙂
Shed with Vinyl Siding and “Bear Proof” Trash Boxes
Shed with Tire Storage Covered in Vinyl Siding
Toolshed Before Finishing
Toolshed with Capped Door
Completed Toolshed
FINAL THOUGHTS
We really enjoyed working on this project, and the owners were wonderful. They mentioned some other interesting projects they wanted to tackle in the future, so we may be back there soon.
A Beautiful Bathroom Renovation in Murillo
A client approached Mavriq Construction to renovate one section of their house that a previous homeowner had built. There were some issues due to prior poor construction, which needed to be corrected. The project was a bathroom renovation and beautification of other areas in the newer “wing” of the house.
The original bathroom was a sauna that a previous owner had converted to a shower. The headroom was low as that aspect was never changed when they removed the sauna. The drain was in the wrong location, and we had to open the concrete to fix it anyway, so we proposed a curbless shower. It wouldn’t add much to the cost and would be cost-effective for a stunning result.
The original door was tiny and swung out into the hall. We added a pocket door as this allowed a much larger doorway without having to worry about obstructions.
BEFORE THE RENOVATIONS
Shower Before Renovations
The Old Stairs
DURING THE RENOVATIONS
We found several issues during the bathroom renovation that needed to be fixed. The original shower had several plumbing issues and poor insulation on the outside walls. These were quickly dealt with as we rebuilt the room. We used several products from Schluter, including Kerdi Board, Kerdi Line and various waterproofing products. These are fantastic products. They may cost more than conventional materials but produce far better results.
We were asked to replace the stairs with something more attractive and functional. We started by expanding the entrance since it was only 28 inches wide, far too small, as it was the only way to move furniture in and out of that section of the house. In only 2 hours of work, we created a new opening with a properly supported header. When we removed the old stairs, we found a rotting foundation behind them. The rim joist disintegrated, and we replaced it and slightly reworked the concrete.
The ductwork passed under the stairs, and one register was in a closet. We added a header to move the duct further down the wall into the room. There was no cold air return in the area, so we cut a hole in the basement door and installed a grate. Not great, but a vast improvement on what was there. The only way to fix it would have been a massive job since it was slab on grade, and cold air vents would have to be under it.
We capped the stair treads with Oak with a dark stain and painted the rest white. The result is quite pleasing and relatively inexpensive.
Adding a Pocket Door
The “Bones” of the New Stairs
THE END RESULT
Vanity with Double Sink
Curbless Shower
Stairs Capped in Dark Oak
The clients were delighted with the result and asked us to come back for another project to remove a wall and add a beam. More on that project later. The key takeaway from this bathroom renovation is that sometimes a general contractor can add impressive features at relatively little extra expense. The curbless shower and widened doorway cost under a thousand dollars extra since we were already doing some demolition to those areas. Your choice of general contractor is critical if you want someone who can design, build and think outside the box while on site.


